


Collaborative ML with TensorBoard.dev
TensorBoard.dev: a new way to share your ML experiment results


Collaboration is a key aspect of Machine and Deep Learning and it requires sharing the details such as visualizing the models, understanding biases of the model, etc. TensorBoard, a TensorFlow visualization toolkit, is frequently used to display and share results with the larger community, although it has some drawbacks, including the ability to publish static results and snap screenshots. This is ineffective and liable to mistakes. It's where the TensorBoard.dev story is, let me try to explain you.
What is TensorBoard.dev?
TensorBoard.dev is a free, open version of TensorBoard that enables users to upload and share the findings of their machine-learning experiments. TensorBoard.dev raises the bar for machine learning visualization thanks to its user-friendly platform and smooth TensorFlow integration. TensorBoard.dev provides a managed TensorBoard service that will enable you to dynamically share or host visualizations, and experiments to anyone.
Sharing and collaboration with TensorBoard.dev is very easy and straightforward. I will highlight all the steps needed to use TensorBoard and highlight key outputs.
Advantages of TensorBoard.dev
Performance Tracking: TensorBoard.dev allows you to track and visualize metrics during the run of your model, such as loss and accuracy.
Model Debugging: TensorBoard.dev provides graphical visualizations of your computational graph, which can aid in understanding and debugging your models.
Hyperparameter Tuning: With TensorBoard.dev, you can compare different runs and configurations of your model, making hyperparameter tuning more intuitive and effective.
Sharing: TensorBoard.dev’s sharable links allow you to easily share your results with colleagues, fostering collaboration.
Historical Records: TensorBoard.dev keeps a record of your past runs, helping you track progress over time.
Ease of Use: TensorBoard.dev is designed to be user-friendly, with a simple command-line interface for uploading results.
Now you get why you have to use TensorBoard.dev, let's see how to enter in.
Enter TensorBoard.dev
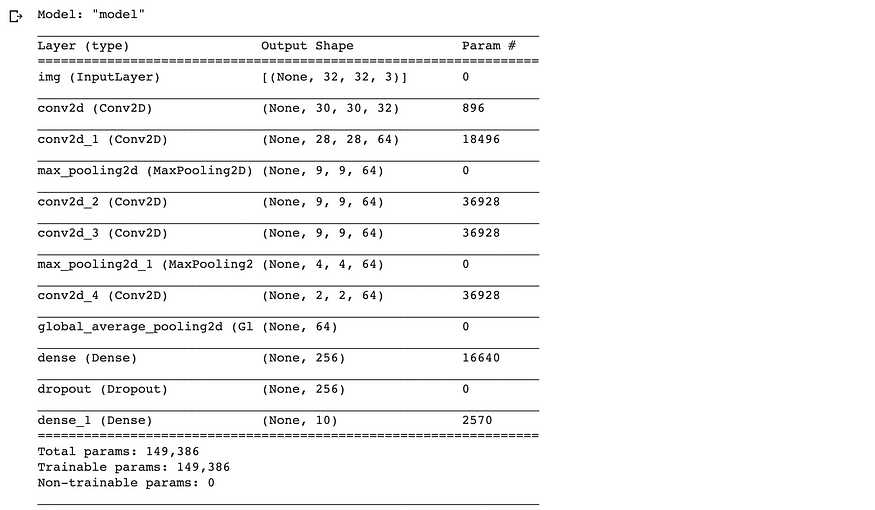
First, create a model in TensorFlow 2.0 using Google Colab (or use an existing model). Then, compile the model. The following is a model overview of an autoencoder I developed using the tf.keras API:
Next, let's make a temporary directory to record all callback values using the tf.keras.callbacks.TensorBoard :
import datetime
log_dir=”logs/fit/” + datetime.datetime.now().strftime(“%Y%m%d-%H%M%S”)
tensorboard_callback = tf.keras.callbacks.TensorBoard(log_dir=log_dir, histogram_freq=1)# Training the model autoencoder using callbacks option
autoencoder.fit(x_train, y_train,epochs=25, batch_size=128, validation_data=(x_val, y_val),callbacks=[tensorboard_callback])
After this, upload logs into Tensorflow.dev using the following command :
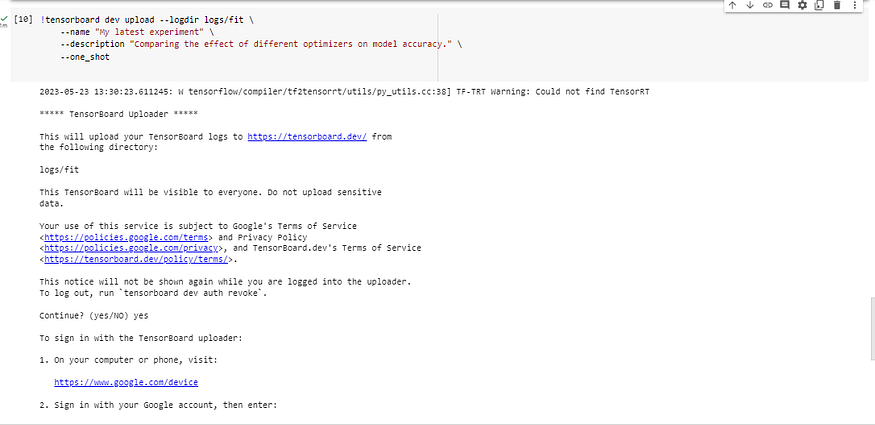
!tensorboard dev upload — logdir ./logs
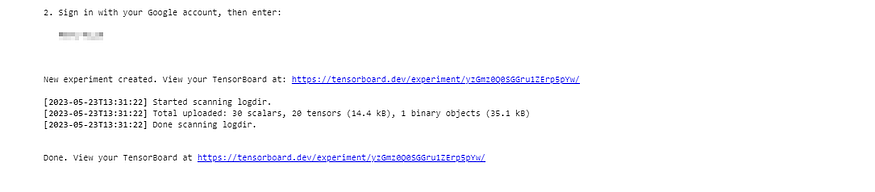
You must authorize your Google account (like Gmail) to upload. You will receive a special URL to the TensorBoard.dev of the particular experiment once you log in with your Gmail account and enter the provided code into the cell:

Clicking on the link will take you to a specific TensorBoard of the experiment.
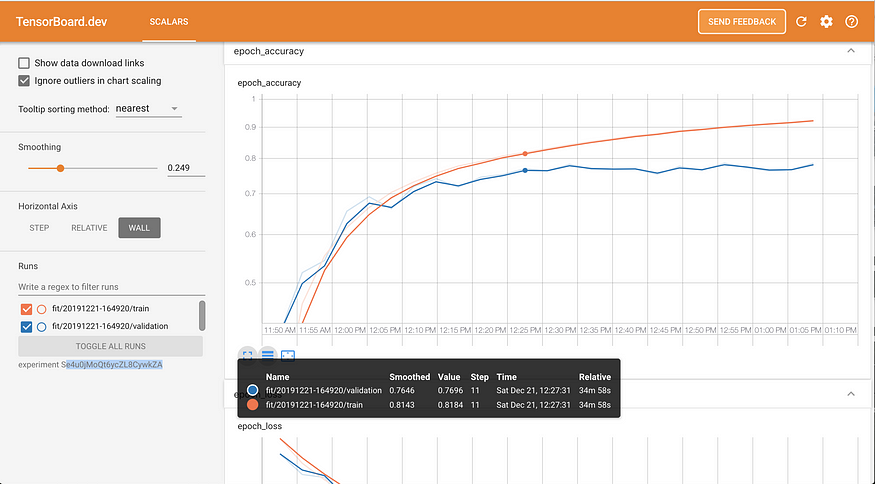
Epoch accuracy and loss, by training and testing, is being plotted against time (25 epochs started at 11:50 AM and 1:10 PM). You could change the horizontal axis to look at accuracies and losses by epoch steps.
TensorBoard will remain active until the specific experiment is terminated. A specific TensorBoard is visible to anyone with a link.
To terminate, you need to grab experiment_id and pass it to delete command
# EXPERIMENT_ID is available in tensorboard dev delete --experiment_id EXPERIMENT_ID.
After this overview of how to handle TensorBoard.dev, I want to resume steps with you using a small example so it will look clearer and more fun.
TensorBoard.dev sharing in 6 steps
Step 1: Install
Command to use
!pip install tensorflow !pip install tensorboardStep 2: Train a Model
To demonstrate TensorBoard.dev, I’ll use a simple TensorFlow model training example :
import datetime
log_dir=”logs/fit/” + datetime.datetime.now().strftime(“%Y%m%d-%H%M%S”)
tensorboard_callback = tf.keras.callbacks.TensorBoard(log_dir=log_dir, histogram_freq=1)# Training the model autoencoder using callbacks option
autoencoder.fit(x_train, y_train,epochs=25, batch_size=128, validation_data=(x_val, y_val),callbacks=[tensorboard_callback])

import tensorflow as tf
from tensorflow.keras.layers import Dense
from tensorflow.keras.models import Sequential

# Load the dataset
mnist = tf.keras.datasets.mnist
(x_train, y_train), (x_test, y_test) = mnist.load_data()
x_train, x_test = x_train / 255.0, x_test / 255.0

# Define the model
model = Sequential([
    tf.keras.layers.Flatten(input_shape=(28, 28)),
    Dense(128, activation='relu'),
    Dense(10)
])

# Compile the model
model.compile(optimizer='adam',
              loss=tf.keras.losses.SparseCategoricalCrossentropy(from_logits=True),
              metrics=['accuracy'])

# Fit the model
history = model.fit(x_train, y_train, epochs=5, validation_data=(x_test, y_test))

Step 3: Set Up TensorBoard
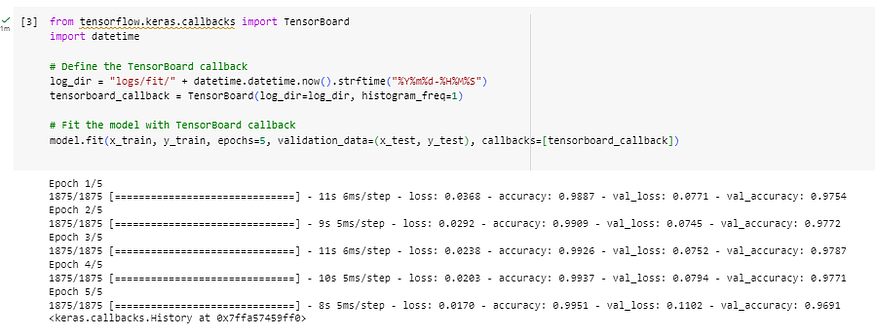
To log events for TensorBoard, I'll build up a callback for TensorBoard and pass it to the fit() method.
import datetime
log_dir=”logs/fit/” + datetime.datetime.now().strftime(“%Y%m%d-%H%M%S”)
tensorboard_callback = tf.keras.callbacks.TensorBoard(log_dir=log_dir, histogram_freq=1)# Training the model autoencoder using callbacks option
autoencoder.fit(x_train, y_train,epochs=25, batch_size=128, validation_data=(x_val, y_val),callbacks=[tensorboard_callback])

from tensorflow.keras.callbacks import TensorBoard
import datetime

# Define the TensorBoard callback
log_dir = "logs/fit/" + datetime.datetime.now().strftime("%Y%m%d-%H%M%S")
tensorboard_callback = TensorBoard(log_dir=log_dir, histogram_freq=1)

# Fit the model with TensorBoard callback
model.fit(x_train, y_train, epochs=5, validation_data=(x_test, y_test), callbacks=[tensorboard_callback])
Step 4: TensorBoard in local
With the following line in your terminal, you can start TensorBoard locally in your browser (Colab). I will explain how to level up with Colab in one of my next article, now just google it.
# !tensorboard --logdir /content/logs/fit
from tensorboard import notebook
notebook.start("--logdir /content/logs/fit")
Step 5: Uploading to TensorBoard.dev
!tensorboard dev upload --logdir logs/fit \ --name "My latest experiment" \ --description "Comparing the effect of different optimizers on model accuracy."
--one_shot
Step 6: Share and Delete Experiments
By simply sharing the URL that was provided when you uploaded your experiment, you can share your TensorBoard.
Use the following command to remove an experiment you've uploaded:
!tensorboard dev delete --experiment_id YOUR_EXPERIMENT_ID
Replace YOUR_EXPERIMENT_ID with the id of the experiment you wish to delete. This id is part of the URL that was returned when you uploaded the experiment.
Conclusion
To communicate and visualize your machine learning models, use TensorBoard.dev. Any data scientist and Machine Learning Engineer who wants to learn more about their models, solve problems, and work with others must have this tool. Just try it and give me feedback in the comments and don't forget to like, share and give suggestions.
Here comes the end of our article, so please share your experiments with others and build the future. In my next article, will see how to build Machine Learning Pipelines don't miss it.
Coding is fun!
Reference for this article :
https://www.tensorflow.org/tensorboard
If you like this content please like it ten times, share the best you can and let a comment or feedback.
@#PeaceAndLove