A tree-based modeling package utilizing Keras API within Tensorflow that what we call TensorFlow Decision Forest.
Why do you need to read this article, trust me if you are preparing for the Google ML Engineer Exam (The best one for ML Engineer in the world actually : 3 great years of experience recommended before passing it) you will be as keen as me now to learn more TensorFlow Extended (TFX) for MLOps, given its full spectrum of standardized components, beam-powered distributed processing and production readiness.
So what is the relation with Tensorflow Decision Forest(TF-DF)?
In May 2021, the Google TensorFlow team open-sourced TensorFlow Decision Forest. This made it possible to create ML pipelines for tree models as well as deep learning models, which are both considerably more interpretable as a result. Do you get the point? TFX for MLOps is a complete ML pipelines tools maker and TF-DF is an easier maker for ML pipelines now open to us. The combination of the two makes it even harder to resist, really amazing, so sexy don't you think?
Before going far and deep in our relationship😂let me fix some rules here🤓
Alerts :
TF-DF is not yet available for Mac (no. 16) or Windows (no. 3) they still working on it TF Google Teams (maybe I have to join to work on it 😎), for Mac TensorFlow environment troubles, I talked about it here. Window users can use WSL+Linux.
To run it locally on Mac or Windows, one has to set up a container or play with it on Google Collaboratory (strongly recommend by me because more easier, we love to make things simpler)
Because TF-DF is not yet fully canonical, integrating it with TFX may not be as easy as integrating it with other Keras models, and there does not appear to be any documentation on doing so currently.
After the alerts, I will spoil on what coming next😂: finding a method to locally test and learn the MLOps with TFX utilizing TF-DF models, I know I said easy but I not taking that way because we have to make things simpler for others😉 😌
Environment Setup
TF-DF Step : Base image
The first step is to create a base image based on Linux that contains only the essential software. TF-DF distribution is presently only available on this one platform. On it, all local development or deployment in the future (like Kubeflow) will be predicated. The versions of the pinned packages are linked to https://pypi.org/project/tfx/. After that, the image is tagged and published as a public repository on your Docker Hub.
from python:3.8.11-slim-buster
run apt update
run apt install -y gcc g++ \
&& apt-get autoremove -yqq --purge \
&& apt-get clean \
&& rm -rf /var/lib/apt/lists/*
RUN pip install --upgrade pip
RUN pip install tfx==1.2.0 \
tensorflow_decision_forests==0.1.8 \
tensorflow==2.5.0\
pydantic
Development image
A dev image was also created by me for local development. Take into account that I am using JupyterLab to execute model analysis for TensorFlow, and I implemented the required extension by the installation guide (see below).
from arthurstarks/tfx-tfdf

# for local dev in jupyter-lab
RUN pip install jupyterlab==3.0.0 \
    jupyterlab_widgets==1.0.0

RUN apt-get update
RUN apt-get install -y curl

RUN curl -fsSL https://deb.nodesource.com/setup_lts.x | bash -
RUN apt-get install -y nodejs

# https://github.com/tensorflow/model-analysis#installation
RUN jupyter labextension install tensorflow_model_analysis@0.33.0

EXPOSE 8888

ENV TINI_VERSION v0.19.0
ADD https://github.com/krallin/tini/releases/download/${TINI_VERSION}/tini /tini
RUN chmod +x /tini
ENTRYPOINT ["/usr/bin/tini", "--"]
A docker compose the local dev container is then spun up using yaml, and all external pipeline files and data are mounted on volumes. Since we would not have to rebuild the picture frequently, development would be simple. The port mapping would enable running tensorboard within jupyterlab as well as access to the jupyterlabserver from localhost:8888.
version: "3.8"
services:
  pipeline:
    build:
      context: .
      dockerfile: Dockerfile_dev
    volumes:
      - ./penguin-pipeline:/penguin-pipeline
      - ./models:/models
      - ./data:/data
    ports:
      - "8888:8888"
      - "6006:6006"
    entrypoint: [ "jupyter", "lab", "--allow-root", "--ip",  "0.0.0.0",  "--no-browser" ]
Debugging
It is feasible to connect to the dev image running in a container using VScode (https://code.visualstudio.com/docs/remote/containers) and set up breakpoints as usual.
Here comes the real stuff 🫡
TFX Pipelines step
I wanted to start easily by constructing a toy pipeline that would utilize all of TFX's standard components from beginning to end. I attempted to create a straightforward Random Forest model for that using the penguin-dataset (https://storage.googleapis.com/download.tensorflow.org/data/palmer_penguins/penguins.csv). I was able to run the pipeline inside the development container and see pipeline_output updated in the local file system by following the examples from both the TFX and TF-DF docs. As it went along, I observed:
It must have an integer label column to be recognized as a Keras model, categorical features do not require one-hot encoding. Although TF-DF permits missing values, I had to remove all rows with blank values for TFX CSVExampleGen to appropriately refer to the column type. In upcoming use cases, this still has to be researched a little bit more.
The script for generating the processed data and saving it to the ./data folder :
from config import pipe_config
import urllib.request
import os
import pandas as pd


_data_url = "https://storage.googleapis.com/download.tensorflow.org/data/palmer_penguins/penguins.csv"
_data_filepath = os.path.join(pipe_config.SCHEMA_DATA_ROOT, "data.csv")
urllib.request.urlretrieve(_data_url, _data_filepath)

dataset_df = pd.read_csv(_data_filepath)
print(dataset_df.shape)
# Name of the label column.
label = "species"
classes = dataset_df[label].unique().tolist()
print(f"Label classes: {classes}")
dataset_df[label] = dataset_df[label].map(classes.index)
clean_df = dataset_df.dropna()
print(clean_df.shape)
clean_df.to_csv(_data_filepath, index=False)
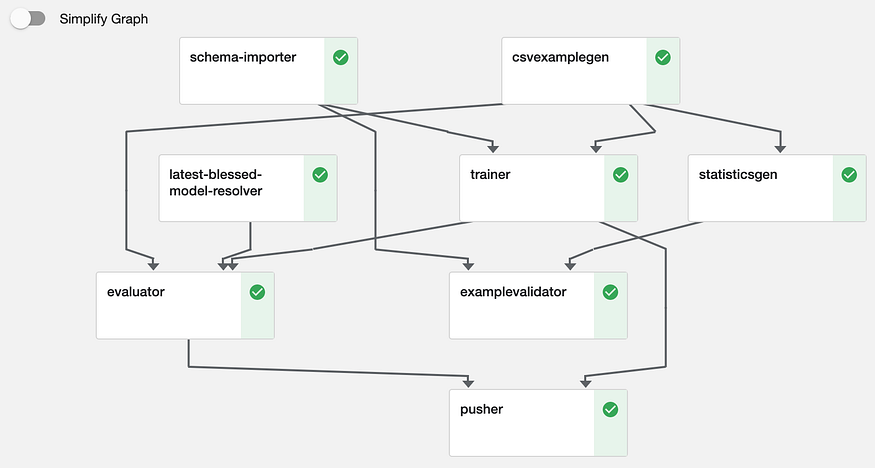
csvExampleGen — reads processed source data from the file system, makes train-eval split, and creates compressed
tfrecordfor training and evaluation;statisticGen — reads training and evaluation data and computes descriptive statistics;
schema-importer — reads the schema generated from the first pipeline run
exampleValidator — determine if the new batch of data shows anomalies as compared with the previous batch
trainer — train the Random Forest model with training data and export both the trained model as well as model runtime statistics which can be used for tensorboard evaluation.
evaluator — this is for calculating metrics for model evaluation, as well as comparing with the last run model to determine if the new model is to be promoted as
BLESSEDbased on user-defined threshold.
I was eager to see how this toy pipeline had performed, as all data scientists and ML Engineers anticipate. In the real-life scenario, ***I can see someone thoroughly scrutinizing the pipeline output and the artifacts as part of their regular work***😁(My friends Data Engineers).
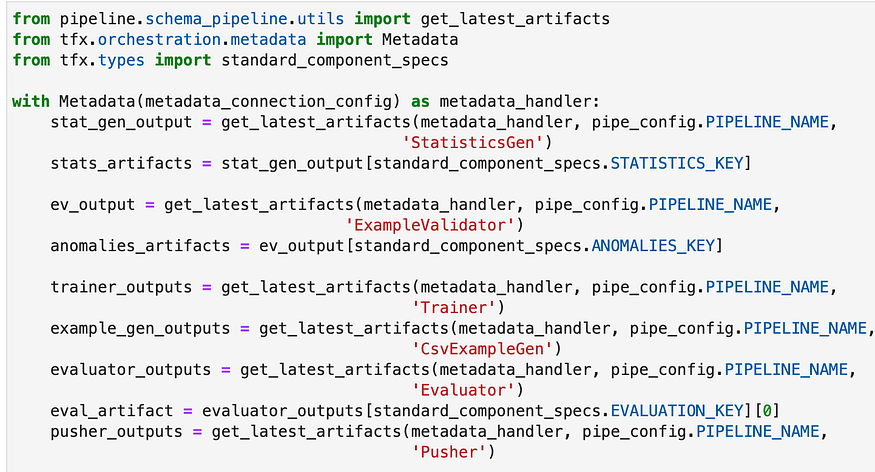
To retrieve information about the most recent run, connect to the ML Metadata (MLMD) database first. The database is in SQLite in a local environment; however, it may be on a MySQL server during deployment.
Then I could use visualizations with Tensorboard (if you don't get what is it and how to use it : here please) to take a closer look at the artifacts.
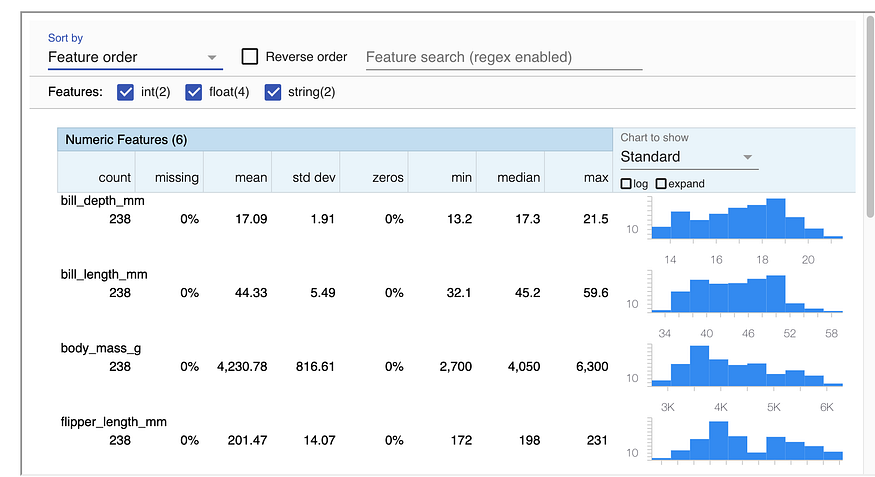
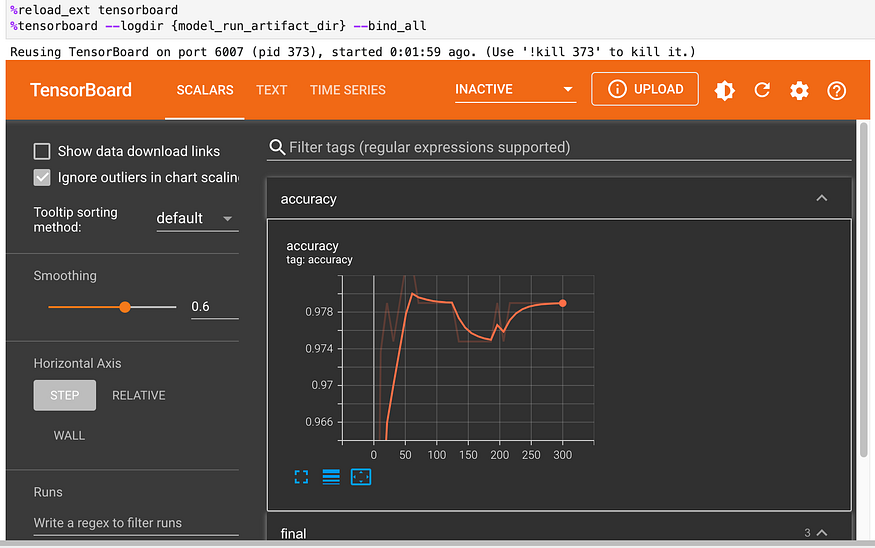
Slices of data fairness indicator: In this instance, female penguins anticipate with significantly greater accuracy than males. Other metrics and data slices are also available for comparison (do
islandshave varying recall for penguin prediction, for instance).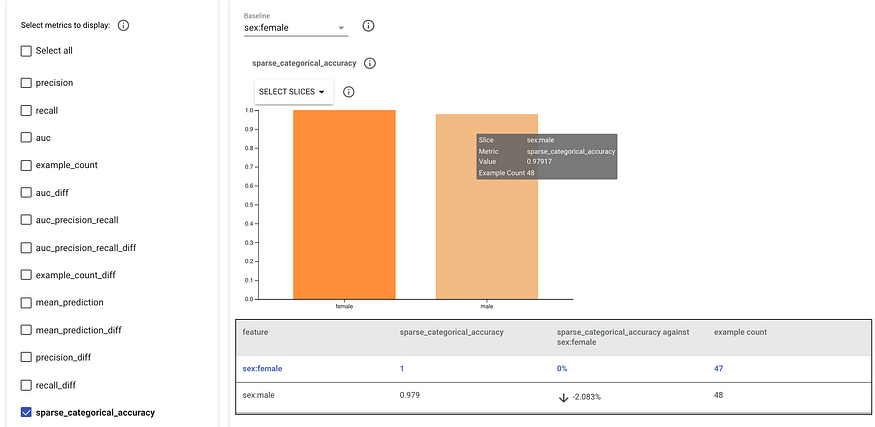

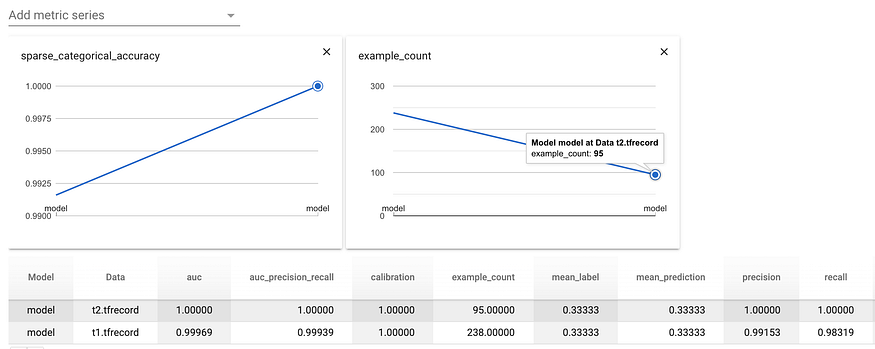
Monitoring model performance over time is crucial for MLOps. This is because data drift might lead a previous model to lose validity and necessitate retraining.
I cannot just use the artifact result from the most recent evaluator to simulate that. Because it evaluates a new model using the same (potentially) batch of data rather than the same model with fresh data and then decides whether to promote the candidate model to BLESSED.
I used the training and assessment sections of the lastest csvExampleGensplits and ran the same model (the most recent pushed model) via Tensorflow Model Analysis (TFMA) to simulate the arrival of new data. Please take note that I must unzip the gz file before copying the tfrecord file to a temporary location. Additionally, it appears that using the eval_config.json generated from the evaluator artifact should be avoided (please let me know if there is a method to convert).
from google.protobuf import text_format

# TODO how to create EvalConfig from eval_config.json from pipeline_output

eval_config = text_format.Parse("""
  ## Model information
  model_specs {
    # For keras (and serving models), you need to add a `label_key`.
    label_key: "species"
  }

  ## Post training metric information. These will be merged with any built-in
  ## metrics from training.
  metrics_specs {
    metrics { class_name: "ExampleCount" }
    metrics { class_name: "SparseCategoricalAccuracy" }
    metrics { class_name: "AUC" }
    metrics { class_name: "AUCPrecisionRecall" }
    metrics { class_name: "Precision" }
    metrics { class_name: "Recall" }
    metrics { class_name: "MeanLabel" }
    metrics { class_name: "MeanPrediction" }
    metrics { class_name: "Calibration" }
    metrics { class_name: "CalibrationPlot" }
    metrics { class_name: "ConfusionMatrixPlot" }
    # ... add additional metrics and plots ...
  }

  ## Slicing information

  # overall slice
  slicing_specs {}

  # slice specific features
  slicing_specs {
    feature_keys: ["sex"]
  }
  slicing_specs {
    feature_keys: ["island"]
  }
""", tfma.EvalConfig())
import gzip
import shutil
import os
import tempfile
import tensorflow_decision_forests

# 1. Create data and model

DATA_ROOT = tempfile.mkdtemp(prefix='past-data')
TFRECORD_DAY1 = os.path.join(DATA_ROOT, 't1.tfrecord')
TFRECORD_DAY2 = os.path.join(DATA_ROOT, 't2.tfrecord')
TFRECORD_DAY1_gz = os.path.join(example_gen_outputs['examples'][0].uri, 'Split-train','data_tfrecord-00000-of-00001.gz')
TFRECORD_DAY2_gz = os.path.join(example_gen_outputs['examples'][0].uri, 'Split-eval','data_tfrecord-00000-of-00001.gz')

with gzip.open(TFRECORD_DAY1_gz, 'rb') as f_in:
    with open(TFRECORD_DAY1, 'wb') as f_out:
        shutil.copyfileobj(f_in, f_out)
with gzip.open(TFRECORD_DAY2_gz, 'rb') as f_in:
    with open(TFRECORD_DAY2, 'wb') as f_out:
        shutil.copyfileobj(f_in, f_out)

# change model folder so that time series graph can show x value as category
model_path = pusher_outputs['pushed_model'][0].uri
new_model_path = os.path.join(DATA_ROOT, 'model')
!cp -R {model_path} {new_model_path}

# 2. Run TFMA and save results

# Put data paths we prepared earlier in a list
TFRECORDS = [TFRECORD_DAY1, TFRECORD_DAY2]

# Initialize output paths list for each result
output_paths = []

# Run eval on each tfrecord separately
for num, tfrecord in enumerate(TFRECORDS):

    # Use the same model as before
    eval_shared_model = tfma.default_eval_shared_model(
      eval_saved_model_path=new_model_path,
      eval_config=eval_config)

    # Prepare output path name
    output_path = os.path.join('.', 'time_series', str(num))
    output_paths.append(output_path)

    # Run TFMA on the current tfrecord in the loop
    tfma.run_model_analysis(eval_shared_model=eval_shared_model,
                          eval_config=eval_config,
                          data_location=tfrecord,
                          output_path=output_path)

# 3. Show results

# Load results for day 1 and day 2 datasets
eval_results_from_disk = tfma.load_eval_results(output_paths[:2])

# Visualize results
tfma.view.render_time_series(eval_results_from_disk)
The result shows the “new” data (t2.tfrecord) has higher overall accuracy and also higher recall and precision.😇
Bonus and Read you later 🙃
Google Colab is a nice place to start, and getting it up locally offers a greater understanding of the various parts, while version pinning is crucial to ensure everything functions. Some of the TFX or TFMA's visualization features are experimental and could eventually introduce breaking changes. The next step is to put up a local orchestrator (such as Kubeflow) to test how the toy pipeline would function in a more production-like environment as I was limited by time yes I had to work dears so I did not employ Tensorflow Transform in the end-to-end toy pipeline for this part maybe another day, in another article, so read me later, please.
If you need to go more far and deep than me, here are some resources I used :
TF-DF release discussion for Mac: https://github.com/tensorflow/decision-forests/issues/16
TF-DF with TFX discussion: https://discuss.tensorflow.org/t/tensorflow-decision-forests-with-tfx-model-serving-and-evaluation/2137/3
TF-DF tutorial: https://www.tensorflow.org/decision_forests/tutorials/beginner_colab
TFX tutorial: https://www.tensorflow.org/tfx/tutorials
Coursera Machine Learning Modeling Pipelines in Production Wk 4: https://www.coursera.org/learn/machine-learning-modeling-pipelines-in-production/home/week/4
Before going, I just want to remind you this
Feedback is welcomed.
And as always, use AI responsibly.
If you like this content please like it ten times, share the best you can and let a comment or feedback.
@#PeaceAndLove

